Image Processing 5. Color Models
3 min read June 15, 2025 #image processing #javascriptImage Processing 1. Introduction
Image Processing 2. Simple transformation
Image Processing 3. Negate filter, channel extraction and inversion
Image Processing 4. Desaturation
Image Processing 5. Color Models
Image Processing 6. Brightness, saturation, contrast, gamma correction
Image Processing 7. Histogram
Image Processing 8. Image scaling
Image Processing 9. Blur
Image Processing 10. Convolution Kernel
Image Processing 10. Convolution Kernel
Working with the RGB model isn't always convenient. For example, printers don't follow the RGB model, because they use white paper and consume less ink for light tones. This is why multiple models exist to solve various tasks. We'll discuss the main color models here. And to keep things interesting, we'll play around with some sliders.
![]()
RGB Correction#
RGB correction is used when you need to slightly adjust a photo if it has too much of an unwanted tint. For instance, incorrect white balance can give a photo a blue or orange tint.
The RGB correction filter is implemented very simply. There're three sliders with a range from -255 to 255 inclusive, one for each color component.
We simply iterate through the pixel array, split each pixel into three components, and add the corresponding value. It's important not to forget to clamp the result to the 0..255 range.
;
;
;
for ; i < dst.length; i++
Original on the left vs R=41 G=-7 B=-18:
Brightness#
If you adjust all three values simultaneously, you get the Brightness filter.
Original on the left vs brightness=-45:
CMYK Color Model#
CMYK (cyan, magenta, yellow, black) is used in printing. Printers use white paper and mix cyan, magenta, and yellow to get the required color. To conserve colored ink, a fourth component K (black intensity) is used.
Values will now be specified in percentages.
;
;
;
;
for ; i < dst.length; i++
For clarity, I suggest first setting all components to -100. This results in a white "sheet". Now, if you gradually increase the black intensity (K), a grayscale image will appear. Here is an example with C=M=Y=-100, K=0:
Gradually adding "ink" produces a color image. C=-12 M=-43 Y=K=0:
C=-24 M=-18 Y=3 K=-28:
HSL Color Model#
The HSL model is based on more human-intuitive color perception and uses the following components: hue, saturation, and lightness. Indeed, it's easier to say "make the photo a bit brighter and slightly more saturated" than "increase red and green while reduce the blue a bit."
Besides HSL, there's a similar HSV (or HSB) model: hue, saturation, value (or brightness). The difference is that the maximum value of the third component in HSL gives white, while in HSB/HSV it gives a bright color.
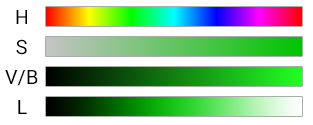
HSB/HSV can be represented as a cone. Hue is defined as an angle on the circumference, saturation as the distance from the center, and brightness as the height. The cone's apex represents black.

Original:
H=0 S=67 L=-3:

H=75 S=-39 L=0: