Image Processing 8. Image scaling
2 min read June 23, 2025 #image processing #javascriptImage Processing 1. Introduction
Image Processing 2. Simple transformation
Image Processing 3. Negate filter, channel extraction and inversion
Image Processing 4. Desaturation
Image Processing 5. Color Models
Image Processing 6. Brightness, saturation, contrast, gamma correction
Image Processing 7. Histogram
Image Processing 8. Image scaling
Image Processing 9. Blur
Image Processing 10. Convolution Kernel
Let's explore a highly relevant topic in image processing: image scaling. You've likely encountered this task and may have even heard about interpolation algorithms used for scaling. This article will focus on that.
![]()
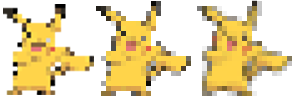
Nearest-neighbor Interpolation#
When scaling using this method, we only manipulate pixels without needing to obtain the values of individual color channels. This allows images to scale very quickly. However, when downscaling - many details are lost, and when upscaling - pixels turn into large squares or rectangles.
const dx = width / newWidth;
const dy = height / newHeight;
forlet y = 0; y < newHeight; y++
let srcY = Math.floory * dy
forlet x = 0; x < newWidth; x++
let srcX = Math.floorx * dx
dsty * newWidth + x = srcsrcY * width + srcX
}
}The original image of size width × height is scaled to newWidth × newHeight. We calculate the increments dx and dy, then for each new pixel, we find the corresponding position in the original image and assign the value.
Original (64×64) in the center, downscaled copy (32×32) on the left, and upscaled version (200×200) on the right:
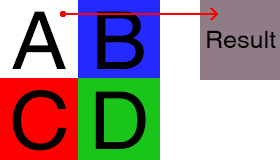
Bilinear Interpolation#
For each point on the image, values of four neighboring pixels are sampled. The value for each color component is calculated using a formula and assigned in the current position.
const xMax =width - 1
const yMax =height - 1
const dx =xMax + 0.5 / newWidth;
const dy =yMax + 0.5 / newHeight;
let dstOffset = 0;
forlet i = 0; i < newHeight; i++
forlet j = 0; j < newWidth; j++
const x = Math.floordx * j
const y = Math.floordy * i
const xDiff =dx * j - x;
const yDiff =dy * i - y;
const index = y * width + x;
const a = srcindex
const b =x >= xMax ? a : srcindex + 1
const c =y >= yMax ? a : srcindex + width
const d =y >= yMax ? b :x >= xMax ? c :srcindex + width + 1
const red = interpolate
a & 0xff b & 0xff
c & 0xff d & 0xff
xDiff yDiff
const green = interpolate
a >> 8 & 0xffb >> 8 & 0xff
c >> 8 & 0xffd >> 8 & 0xff
xDiff yDiff
const blue = interpolate
a >> 16 & 0xffb >> 16 & 0xff
c >> 16 & 0xffd >> 16 & 0xff
xDiff yDiff
const alpha = interpolate
a >> 24 & 0xffb >> 24 & 0xff
c >> 24 & 0xffd >> 24 & 0xff
xDiff yDiff
dstdstOffset++ =alpha << 24 |blue << 16 |green << 8 | red;
}
}
function interpolate(a, b, c, d, width, height) {
return a *1 - width *1 - height
+ b * width *1 - height
+ c *1 - width * height
+ d * width * height;
}Similarly, we calculate the increment and the distance between old and new positions (xDiff, yDiff), then apply the interpolate function for each color component.
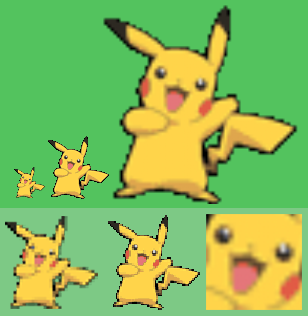
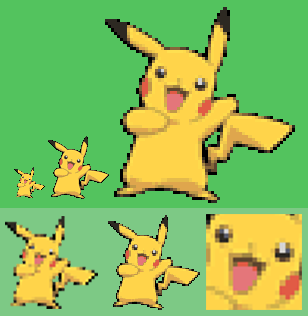
Lanczos Interpolation#
Finally, let's discuss interpolation using the Lanczos filter. This method provides even smoother results, but significantly increases processing time.
The filter can be applied with different kernel sizes (convolution kernels will be covered in a separate article). While bilinear interpolation uses 4 source pixels per new pixel, Lanczos may use 9 (3×3), 25 (5×5), 49 (7×7), etc. Sizes 2 and 3 offer the best balance of quality and speed.
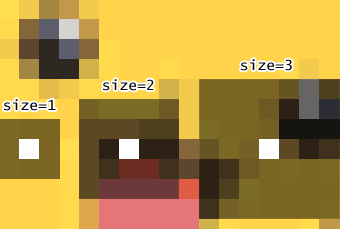
Result for filterSize=2:

Finally, a Pikachu downscaled to 20×20 and then upscaled: